Followers

Wednesday, May 21, 2014

Muse #68

Sharing a quick post , made it exclusive for the Muse challenge


here is the Muse inspiration card
I didn't use any flowers, I just went along with the sketch, and picked up white and pink from the card.


Thank you for stopping by, I appreciate your feedback, if you are not in a hurry :) Have a great day!

Tuesday, May 20, 2014

Zebra pattern embossed card

Made this fun and quirky card two days back.  Used the zebra stripes embossing template for this. Kept the colors monochromatic, the beads are to represent the blue sky, green jungle and an orange sun...this card is based on my interpretation of the movie Madagascar.  Marty, the zebra is my favorite character in the movie,  so went along with the zebra theme. 
I kept going back and forth during choosing the front panel, to choose white or black? But chose black card stock, I prefer using white color over the  black.
So I after embossing, I colored the elevated stripes in white.


A closer look at the embossing.


Posting this card with the: 

I was inspired by the movie Madagascar. 


I spot the zebra pattern in pink, used it as my inspiration from the picture, with my own colors.


Thank you for stopping by, I appreciate your feedback, if you are not in a hurry :) Have a great day!

Monday, May 19, 2014

Kesar Kulfi ~ Indian Ice Cream with saffron


Sharing a recipe today not a card. The weather is soooooo hot that I find myself looking for some cold stuff to munch on.
This is my family's one of the most favorite desserts, I always get requests to make this one when I go back home during summer vacation.
Very simple,  no cooking required! 
I didn't make this time, my daughter made this.

Ingredients :
1 small can carnation milk (170g)
1 small can fresh cream (200g)
1 can condensed milk (150-200g)
2TBsp white sugar
1 slice bread (crust less)
1cup full cream milk
A handful of raw peeled pistachios
2-3 pods cardamoms crushed
5-6 strands of saffron

Procedure :
Put everything in the blender and blend till a smoothie like consistency.
Put in the molds or in a container and freeze for at least 5hours or till completely frozen.
Done....remove from the molds, you can cut it or eat straight with the stick.
Scoop the container ones, I usually use small containers to freeze when I rum out of molds, so no need to scoop,  just eat straight from the mini containers.


ready to blend - all the ingredients in the blender

After the blending

in the molds

ran out of the molds, so used a container, will have to use ice cream scoop.

Frozen...and ready set go
 Hope you enjoy this simple dessert.

Thank you for stopping by, I appreciate your feedback, if you are not in a hurry :) Have a great day!

Saturday, May 17, 2014

Eyelet stitch - thank you

Squeezing a quick post in between my busy schedule. Didn't get to do any crafting yesterday, sat down this morning to make this one.
Used eyelet stitch to do the embroidery.
Used the color throwdown's color palette.


I cut out a tear shape, and went on to draw this flower and leaves.

For eyelet stitch, you need to pierce a bigger hole in the middle of the shapes, and do the stitching.  Its a very easy one!

Posting this with

Thought of adding another one!


Thank you for stopping by, I appreciate your feedback, if you are not in a hurry :) Have a great day!


Friday, May 16, 2014

Handmade flower stencil

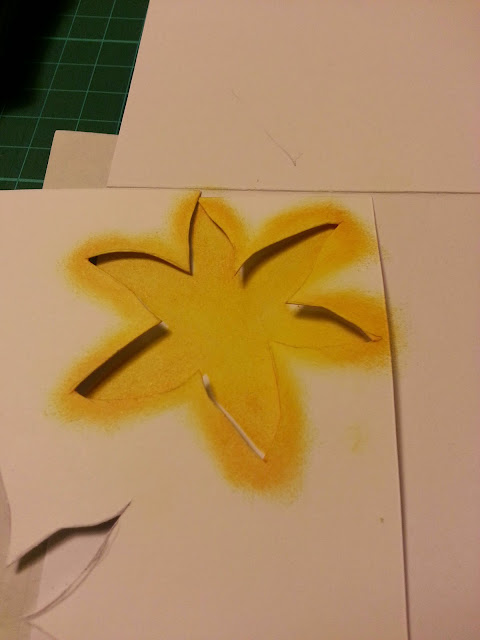
I don't own any flower stamps yet, might get it one day. I am reasonably ok at drawing flowers and leaves (studying botany did come handy here ;) ). So I drew few flowers, I wasn't thinking of any particular flower, just a freehand. Cut out, saved the flower for later to do maskings, and used the stencil.
I had a super busy day at school, and when I sat down in the night to do the ink blending, it was incredibly relaxing! Used 3 different shades of yellow to ink the flowers. Black ink for the center,  and added some transparent glitter glue to give more dimension to the flowers. With a light hand, I went on to ink the white patches in between the flowers.
Was going to stamp a sentiment, but my darling daughter was working besides me on her homework,  and suggested not to stamp anything unless I want to spoil the beauty - really?? You can see I took her advice. (I trust her artistic intuitions,  she is much more better than me).


A close up

Behind the scenes:

freehand drawing

trimming

inking
posting this to 


Thank you for stopping by, I appreciate your feedback, if you are not in a hurry :) Have a great day!


Thursday, May 15, 2014

Splash ~ Celebrate

My definition of splash is either my kiddos splashing something at home or my students splashing something at school.
But the card I made is a different kind of splash, I am trying to mimic a relaxing beach holiday with waves and cocktails splashing ;)

Just sponged the sea, tried to mimic some waves, and a bit of beach.
Mixed few colors till I was satisfied to get the splash color.
Stamped footsteps and a simple sentiment to finish off.


Posting this to 


Thank you for stopping by, I appreciate your feedback, if you are not in a hurry :) Have a great day!

Wednesday, May 14, 2014

Technique card

I made this card based on the kissing technique provided by the Just Us Girls, the technique looked pretty cool to give it a try.
I wouldn't lie, I trashed at least 6 tries before getting the final one, even this one isn't perfect!!!
 Chose the sketch from CAS Colours and Sketches,  and the colors from Addicted to Stamps and More.


The close up, I first inked up the stamp with a pale ochre color, and then went on with black ink, this part was tricky, it wasn't really easy to ink on already inked stamp *phew*, But I am glad that at least I gave it a try :)

Linking this card with

I loved this sketch ,the moment I saw it last week, didn't change the shape, and added some palm twines.

My first time trying this technique, hope I can perfect it one day!


I had just picked up the pink and brown shades from the beautiful inspiration picture!

Thank you for stopping by, I appreciate your feedback, if you are not in a hurry :) Have a great day!

Traced and inked flower

 Sharing some good news first, today my blog is 3 months old, yipee...the first post I put up on was 14 Feb,  yesterday morning(I live in Macau, so timings are very different) I won a blog hop at STAMPlorations, and also yesterday night my card was chosen as HM at CASology... *doing a happy dance*

This card is an experiment, and I like how it came out, and thought of sharing it.
This rose is inspired from my PJ's, no kidding! I know it sounds crazy, but I went on with my intuition and made it anyway.
Firstly, I used a baking sheet to trace the rose from my PJ, and then I flipped the traced sheet and put it on a white card stock and retraced it. When you do this, the pencil lead will get transferred from the sheet to the card stock.
After that I had inked the rose with 3 different shades of pink. For the leaves I chose yellow and 2 different shades of green.
To finish off, I stamped the sentiment and inked the bottom with my hand made stencil for another card. Tadaaa.... its done. It was fun doing it because I had no clue if it would work, I was ready to trash it if it didn't work. 


Behind the scenes:

The inspired picture on my PJ!

Traced it on to the baking sheet.

Ready to transfer it to the card.

After transferring on card, its bit faded but its perfect to outline with your own choice of colors.
Linking this card with :


Thank you for stopping by, I appreciate your feedback, if you are not in a hurry :) Have a great day!