Followers

Showing posts with label Weaved cards. Show all posts

Wednesday, November 26, 2014

Paper weaving

Hello everyone! Today I am sharing a tutorial.
I am showing a paper weaving technique, its pretty simple.
I am showing two different types of weaves here, a plain weave and a basket weave.

For plain weaving:

You will need paper strips of two different colors, the length and width you can choose according to your project, there isn't any specific measure for this, but has to be same for both colors.


Step by step:

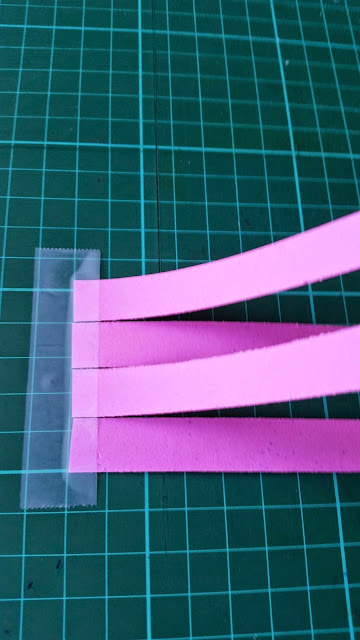
1. Line up the strips on your work-board, and secure with a scotch tape at one end, we are working on the reverse side of the weaved pattern, the front is facing down, so don't worry about messing it up ;)


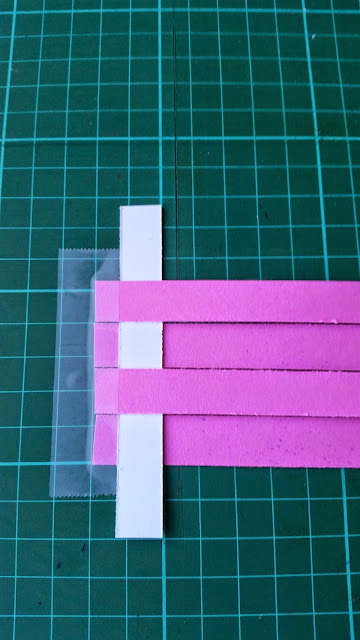
2. lift 2 alternating strips

3. Slip in the other color strip here.

4. This time take another set of alternating strip, the one next to the previous one, and slip in the other color strip.

5. Continue till you reach your desired length of the weave, and once done, trim the excess trips and keep about 1/2" strip, so that we can secure it.

6. Secure the ones, which you can fold in first, you can use a double sided tape, or a glue stick to do this.

7. Lift the left over strips and apply the adhesive to secure it in.

8. Once you are done, turn over the weaved pattern, this is your front, trim the excess strips.

9. Done your pattern is ready to be used for your project.

Here is a card I made using a plain weave.
--------------------------------------------------

Basket weave

You will need paper strips of different width here, one is wider than the other, but same color strips.

1. Secure the wider strips to the board with a scotch tape.

2. Follow the weaving procedure we did earlier for the plain strips.

3. The second strip need to be bit far away from the first one, to give a basket weave look, I would say at least 1/2 - 3/4" away from each strip.

4. Finish up the length of your weave

5. Secure in the same way we secure the previous strip, but here I don't secure the wider strip ends, I adjust it with my project and secure it. I mostly make cards, so the length differs from card to card.

A card using a basket weave.  

---------------------------------------------
Eye Candy

  This card is another kind of weave, totally different from what I showed just now....will add a tutorial if anyone is interested.


I hope you have enjoyed this T time, and I really hope I had inspired at least one person with this tutorial. I look forward to your comments!

Friday, September 12, 2014

One weaved and one sponged card

Sharing 2 cards which i made yesterday evening, the first one up is a sponged card. 
I choose navy blue, black, magenta, and yellow inks to create the full moon sky, I was out just 2 days back in the night, and witnessed the full moon night, the sky wasn't really dark. It had a blue, and pink hue, so I am trying to bring the look on this card. 
I sponged yellow and magenta around the moon to give the radiance, decided to keep the moon really white, so no sponging done on it.
The sentiment has a great meaning to me personally. I am living an expat life for a decade and half now, and I meet/met so many wonderful people. We meet and then either of us have to part ways to pursue a new job or livelihood. So this card, I am dedicating in honor of all the wonderful friends I have met along, and I am in touch with them on some platform.

The trees are from my custom made stamps, this is the first time I am using these, and I am glad I did!


No relevance, but adding the picture of the full moon night, and the fireworks we witnessed for the lunar festival here in Macau.

 Adding this card to 

My second entry here :) , I have used the trees stamps for the first time.


 This is my first time playing here, and I am glad to find this CAS challenge blog!

When I made this card, my daughter did suggested, it has a Japanese feel to it. I was impressed with her, and Anita too suggested to add it here, and we just celebrated the lunar festival called mid-autumn festival in china, and I was depicting the full moon sky, so I am now convinced to add this card here :)


---------------------------------------------

The second card up is a weaved card, I weaved the brown card stock in a basket weave, I am trying to get the look of a flower basket with a message sticking out.
The stamps are  from Avery Elle, I used foam adhesive and added on the toothpicks!
Added 2 blooms,and leaves, and I also trimmed some paper swirls using a green and kraft card stock. Of lately I am hooked on using the hand-cut paper swirls!

It is a very simple card, other than weaving there isn't much on this card, but I am happy how well it turned out.


A close up at the weaving.
Adding this card with

I have used the Avery Elle handwritten stamps.


I was inspired by the tiled up sentiment, so tried to give that look, and the white and brown colors in the picture!

I know it is a bit long post, and thank you for bearing with it :)
Thank you for stopping by, I really appreciate your kind  feedback :) Have a great day!
                                                                

Monday, August 18, 2014

Weaved cards

I am back home from India after spending 6 weeks away from my craft supplies...its great to be back, I have not just returned to my craft supplies,  but also to the daily chores of the, "lady of the house" ;)...the entire household looks like we have relocated to a new home...will have to bring everything in order before my kiddos helping hands get back to school next Monday!!!

Ok now to the cards. I am sharing two cards today. I had used weaving on both the cards. The first one up is a simple weaved card.
The colors and layout both are inspired by two challenges.

I chose to work with white, I added a white panel, which is cut out in 3 different rectangular sizes. 
Chose blue and orange strips to do the weaving. I sponged the top and panel with a blue and orange ink and finishing it off with my custom made stamps, and a few blings.


A closer look at the weaving!

Linking this card with 

The weaving pattern has small squares on it, and the front panel consists of three different rectangles.


Worked with the stated colors only!


-----------------------------------------------------------


The Second one up is a very complicated weaved card.
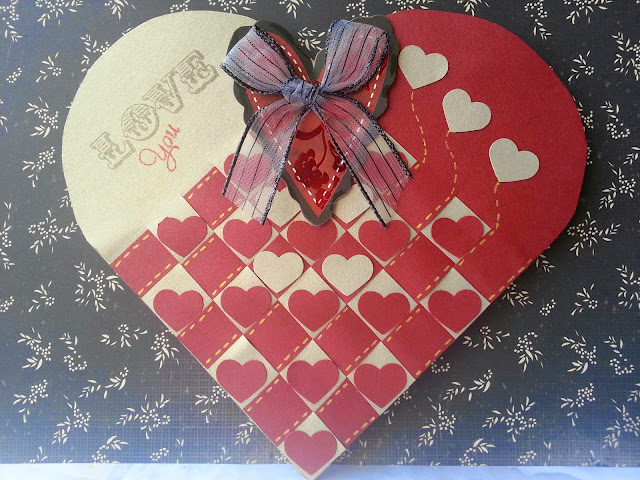
It is actually a weaved heart pocket, to which I had modified into a card.
You need to weave the heart pocket first, and then I simply(not really :) ) cut one end to open up, and adhered it to a heart card base.
I added some punched hearts, and stitches, and another heart with a ribbon bow as embellishments

I took pictures with two different backgrounds!


This card can stand on its own, but this is how it looks, kind of sideways.


A closer look at the front weaving and added work!

Backside weaving!


Since I couldn't take a picture of the weaving, I am sharing my practice weaved pocket, this is how it looks - no joints, it is a single weaved pocket.

for this card, I just slit one side up to open it.

Linking this one with

I would have added few more cards, if time permitting, I make many different types of shape cards,  but didn't have much time for this challenge! But glad that I have another entry here :)


Thank you for stopping by, I really appreciate your kind  feedback :) Have a great day!