Followers

Thursday, September 25, 2014

Hello kitty pink

Sharing a custom made card, I made it yesterday morning for someone. The colors were asked , and luckily matched with a challenge, which doesn't happen very often.

I chose the dotted hot pink card stock from bazzill basics, a white card base, its a huge card.
I had done some hello kitty stamping with pink on the pink front, as the birthday girl loves pink and hello kitty!
Also added a scalloped panel in a darker shade of pink. Some layering and finally a chipboard kitty, and few sequins to finish off.


A close up at the hello kitty stamps.

The inside, I am thinking there will be plenty of writing on the inside, so added 2 panels, chose a light pink and distressed the edges using a dark pink shade ink.

the outside with a hello kitty stamp.

Linking this card with

I have used both the sketch as well as the colors.


Thank you for stopping by, I really appreciate your kind  feedback :) Have a great day!

Wednesday, September 24, 2014

Fly the world

Hello everyone, this is my second post of the day, if you are looking for my ATSM DT post please click here
The card which I am sharing, for this I was sitting with this sentiment for quite a few days, because I love the sentiment, and I was figuring it out how to put it to use. Yesterday I went for grocery shopping, and the stationary store is right next to it, to which I am a regular. I was attracted by a card kit(This is the first time ever buying a card kit - beautiful card stocks in it), mainly because of the stamped and embossed die-cuts in the pack, and the retro feel of the whole kit.  
I am sure, you all are familiar with the feeling of using the new things immediately, I sat down after dinner to make this card. 
Chose white base, and the sentiment on white too, but choosing the placements of the sentiment took me quite a while ;) The first part of the sentiment I stick it under the hot air balloon to give a flying feel, and the second part close to the ground, I am happy with the placements. Added a few tiny stars to go with the sentiment to finish off. I hope you like my simple card.


Linking this card with

 I chose a hot air balloon to interpret the word flight.


The moment I saw the cue word, the first thing was butterfly, then birds...but I didn't want to use any of those, then fluttering kites, but I made too many cards with kites, so finally decided to go with the fluttering hot air balloon!

Thank you for stopping by, I really appreciate your kind  feedback :) Have a great day!

ATSM #114

Hello blogger friends, today at Addicted to Stamps and More, we are having a brand new challenge, and its an easy and favorite one - CAS. 

The sponsor for the challenge is 
The winner will get 3 free digis.

For my card, I chose to work with a vanilla textured card stock, I stamped the feathers from STAMPlorations -trendy feathers set, so is the sentiment too.
Added a washi tape, and used foam adhesives for the feathers, I also some hand cut paper swirls, and a twine to tie the feathers, the sequins added here are from embroidery kit, bit different from craft ones. It s very simple card.


Linking this card with

 Runway Inspired Challenge
I was going to do the weaving, but off lately I have done quite a bit of weaving on my cards, so decided to just make use of the colors in the picture.


STAMPlorations anything goes
I have used the stamps from the trendy feathers set to create this card.


Hop over now to the ATSM blog to see what our talented DT's have come up with, hope to see you there with your creations! 

Thank you for stopping by, I really appreciate your kind  feedback :) Have a great day!

Tuesday, September 23, 2014

More pattern paper fun

I made this card yesterday night. I was really impressed with myself when I last made a card for Virginia's pattern paper challenge. I already knew that I would be using the technique in future, so here I am with another card using the same fuzzy cut for the leaves, but this time I decided to add another fuzzy cut flowers from a pattern paper.
Its a simple looking card, other than the time it took me to cut everything, the assembly part was a piece of cake. Added few rhinestones to the flower center, and stamped the sentiment from STAMPlorations and I am done.


A close up at the leaves.
the paper I used for the flowers.
The paper for the leaves
Linking this card with the

The challenge is for pattern papers, and I have used it for my flowers and leaves.

This is my 2nd entry with fuzzy cuts.

Thank you for stopping by, I really appreciate your kind  feedback :) Have a great day!

Monday, September 22, 2014

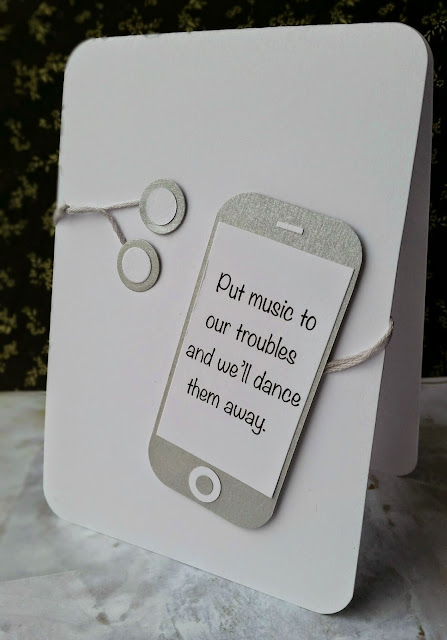
Music and dance

A quick share, was suddenly hit by an idea, and you know sometimes you just need to follow your intuitions and see what you come up with. 
My morning routines are always with music, I connect my S5 to the home theater and then I start my morning housework, so it was a usual day to begin with, and during lunch time I was hit with idea, and lunch by my side, I sat down to make this card. Its a simple CAS card like most of my cards. I chose a shimmery gray card stock to make the phone, I was trying to make my Samsung galaxy S5. I think made a mini version ;)
The sentiment is computer generated, it happens many times that I use quotes on my cards, and cannot find the stamps, so I always end up printing my sentiments.
I also chose the same color scheme to do the earphones, and rounded the corners of the card.


Linking this with 
I have pretty much stick to the words, and made this card!
FACE THE MUSIC AND DANCE

The theme is to use metal, though I have not used any metal, but my interpretation is that,  a phone does have some metal in it, so I chose a gray color to fit in , I hope it qualifies!

I have not used any stamps on my card.

Another entry here, I can add many cards, as I work with a very few colors on my cards, but I think I will stop after this entry ;)

Thank you for stopping by, I really appreciate your kind  feedback :) Have a great day!

Precious memories

Sharing a couple of card which I made over the weekend.

The first one up is an experiment too, I did the background and it was sitting for few days before I decided what to do with it ;)
I did the background with a white nail paint, I did freehand doodle with the nail paint on the white card stock. Then sponged yellow ink, and did buffing using a tissue.
I used distress inks with mist spray to create the feathers background, used a peacock feathers distress ink for this, once the background was all dry, I stamped the trendy feathers stamps from STAMPlorations, and fuzzy cut the feathers. The sentiment is also from the same stamp set.


My freehand doodle with the nail paint.
Linking this card with 

 This will be my 2nd entry here, I always am curious to find out and do different techniques, so nail paints really attract me in here!


Added the feathers for the sketch, pretty much sticking to the sketch this time!


I had added the fuzzy cut feathers!

-------------------------------------

The second one is a simple card, just a sponged background, with a tree stamp, and the sentiment is my custom made one, using it for the first time. I want those tiny birds to stand out, that's why I chose red color to stamp the birds. I chose a pale green card base and added a white front, and a few green sequins to finish off.


Linking this one with 

For double joy, I chose two tiny birds, my interpretation is pretty simple, it is a new start for all the precious memories for Bev and her family. Being a mother myself, I know these small little everyday memories are so precious, and it happens almost everyday!


Thank you for stopping by, I really appreciate your kind  feedback :) Have a great day!

Friday, September 19, 2014

Sunburst card

Sharing a card, which I made 2 days back. I made a sunburst card using a textured yellowish card stock and plain white. It took a while to assemble, since I decided to do a complete circle, but to the edge. This card is a very different sunburst from my previous ones.
I added a circle and stamped the sentiment from STAMPlorations on it.
Added a ribbon, and another sentiment from Avery Elle to finish off.


Linking this card with

I wanted to do the stencils first, but changed my mind and CASE-d this card using a sunburst pattern.

Added only yellow along with black and white.


Thank you for stopping by, I really appreciate your kind  feedback :) Have a great day!

Wednesday, September 17, 2014

Soccer and Grass

I am sharing a quick card, which I made for my darling son. I am sorry, but I will be bragging about him for a while in my post ;)
He is an excellent soccer player, who plays for the Macau national team, and his school team, he plays center forward. In the month of May, he was injured during his practice session, and the doctor told him to take a break from soccer for few weeks. He will be going in to start practices this Friday onwards, and I thought of making him an encouraging card for this occasion. I love to see him play soccer, he is the happiest when he is on the field! and that makes me a very happy mom indeed :)

I just printed off this famous sports quote(I don't have sports related stamps yet!)
Sponged the grass, I have tried to do the streaks to give a grassy feel, and faded it, to give a spacious field look.
I have tried to ground everything on this card, since soccer is played on grass, so keeping the sentiment as close to the grass as possible.
Added few sequins to finish off, very simple card, practically nothing to it which I can brag about, but I love it, hoping you all will like it too :)


I gave a tough of green in the "Soccer".
Linking this card with


SEQUINS CELEBRATION
(Make a celebration card using sequins)

It may not look like the usual celebration card, but it is a celebration card which I made for my son.

Pop of color with black and white

I had just used green along with the black and white .

My interpretation for the cue word grass is soccer's connection with the grass!


Thank you for stopping by, I really appreciate your kind  feedback :) Have a great day!

A blade of grass


A blade of grass


A blade of grass


Tuesday, September 16, 2014

Nail paint card

Today for the first time, I tried a new or call it a crazy technique. Of lately my blog posts are full of different techniques. This one I was tempted to try after seeing the Moxie Fab challenge picture. The picture has nail paint, and we can take any inspiration from it. Myself being crazy for nail art, I knew right away that if I would try anything, it would be related to the nail paints.
I did the gradient effect using turquoise and yellow nail colors. I wouldn't say that I nailed it but it looks kind of ok, so sharing it. 
After the nail colors, I used the honeycomb stencil to do some sponging, and finished off with the sentiment from Avery Elle - handwritten notes.
 Added a few tiny butterflies to finish it off.


The nail paints I used.
Linking this with


I had used a technique for the first time to create my own background!

Thank you for stopping by, I really appreciate your kind  feedback :) Have a great day!

Monday, September 15, 2014

Another tissue transfer

This morning, I made a one layered card using the tissue transfer technique, well after reading Anne's feedback, I was tempted to try this with white card stock, so this time, I had used only the wine glass image for the transfer. I love it, you all know I love CAS cards very much, and most of my cards are CAS and white, so I totally love this one.

Usually I clean up right after I am done with my card, for some reason today, I didn't touch a single thing, so this card is made right away after I saw the comment.
 Thank you Anne for the precious feedback, I am a good listener! Hope you all like this one too.


Linking this one with


Sorry to delete my entry, but I am up with a fresh entry!, and I do hope it will count as one layer because after peeling the 3-ply tissue, all I have done is transfer  of the top most layer :)

BEVERAGES
Thank you for stopping by, I really appreciate your kind  feedback :) Have a great day!

Tissue transfer~ wine glass

This is my second post of the day, well sometimes the creative juices are overflowing ;), which didn't happen in a while! I am glad to be with some motivation :)

This is a one layer card! yes it is! I had used the tissue transfer technique for this card, usually I add a panel of the transfer on the card, but today,I took the risk of adding it to my whole card front. The transfer was brilliant and flawless, so I am very glad that I took the risk.
After the transfer, trimmed off the edges, and added the computer generated sentiment plus, I tiik another risk of stamping a sentiment on the tissue! I tried stamping beforehand on a scrap tissue and it it worked fine, the inks wasn't smudging, so I gave it a go. This sentiment is from STAMPloraions.


Adding the pictures of my process,
1. Spreading the cling wrap on the front of my card.


2. the top peeled layer of the tissue on the cling wrap.

3. Securing the surrounding areas, as I don't have a spare old iron.

4. Ironing the tissue front on full heat for 2-3 minutes.

5. The final product - transfer done!

Linking this card with 

 This is my second entry here, the first one was also with bits of tissue, but this is a complete transfer, and I hope it qualifies here with the autumn colors and the mediums I used.


Thank you for stopping by, I really appreciate your kind  feedback :) Have a great day!